A Quick and Dirty Sweater Cuff Repair

There’s a window of time between October and February when my ‘Owls’ jumper is the only thing in my wardrobe that is guaranteed to keep me warm. It’s by no means my best knitting (some very visible, very dodgey short-rows) and after five years, it’s bobbely and stretched out at the elbows, but I still dig it out every year without fail.

So, when I pulled it on for the first time last autumn, I was devastated to find one of the cuffs had split and started to unravel at the cast-on edge.

I was at a loss about how to fix it, since a straightforward darn wasn’t going to work, and the sleeves were knitted from the cuff up, so I couldn’t easily unravel the broken edge and re-knit it.

Owls Cuff-2

I picked my colleague’s brain about it, and we decided that the only solution would be to cut the whole cuff off and re-knit it from the sleeve down. Terrifying, but do-able!

sleeve cuff 1

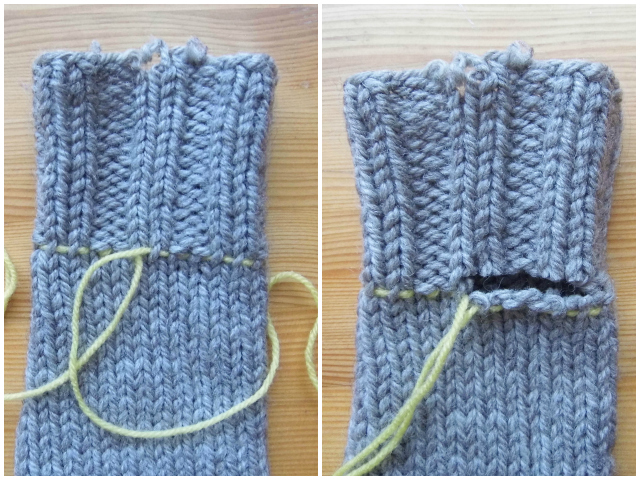
First, I put a safety line in by threading contrast coloured yarn through every stitch around my sleeve, a row below the beginning of my cuff.

I then took a deep breath and cut away the cuff a couple of rows above my safety line (I was wary of accidentally cutting through my safety line stitches and losing them).

Owls Cuff-8

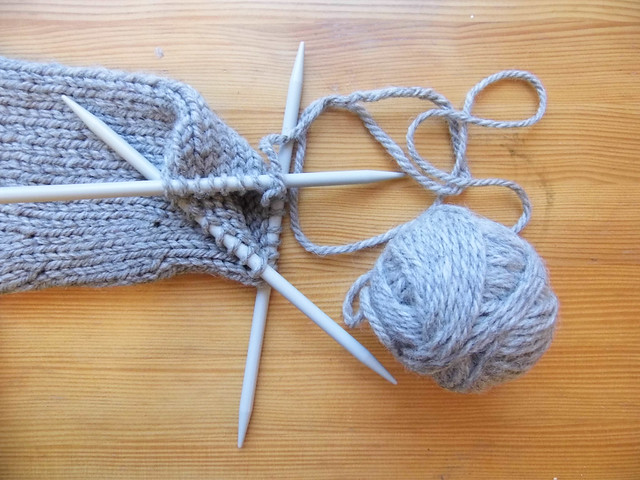
I then put the saved stitches on double pointed needles and ‘tinked’ back one round so I would have a long enough tail to join to my new ball of yarn (I had yarn left over from knitting this jumper, but I could have re-used the yarn from the old cut-off cuff)

Since I didn’t know where my original round started when I first knitted the sleeve, and I would be knitting in the opposite direction to the original (down the sleeve, rather than up the sleeve), I made sure I started my round on the side of the sleeve facing down when I wear it, so the ‘jog’ in the pattern wouldn’t be so obvious.

Owls Cuff-9

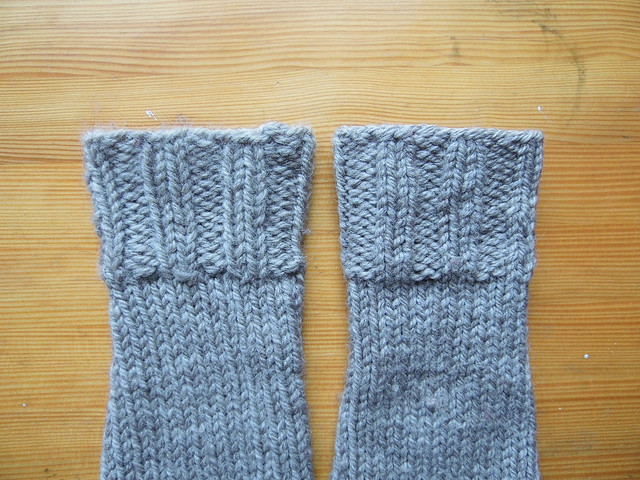
I then re-knitted the cuff following the original pattern. My tension was very different to the original (despite using the same needles and yarn…) so I found I needed fewer rows to get it to the same length as the other cuff.

After a bit of blocking, you can hardly tell the difference between the new and the original (New cuff on the left, original cuff on the right), and my jumper is ready for the next cold winter!

DIY Sponge-bar Repair For Knitmaster 120

NB. This post will only be of interest to knit machine owners, but I thought I’d put it here in case someone else has a Knitmaster 120 and is tearing their hair out…

 Social Fabric recently invested in a knitting machine – a second-hand Empisal Knitmaster 120 Chunky, which was in pretty good shape but had a predictably disintegrated sponge-bar. Given my…ahem…encyclopaedic knowledge and wealth of experience…I was asked to try to fix it.

Knitmaster 120 Spongebar

This machine has a particularly narrow sponge-bar that is no longer manufactured by Knitmaster, and, as far as I’m aware, no-one produces DIY sponge replacement kits for this model either. The only other option was to use spongy insulation tape (or weather stripping, available in most DIY shops) to replace the original sponge, and find a way of cutting it down the middle to make it narrow enough to fit.

Unfortunately, once the old sponge had been cleaned off I realised there was just no way I would be able to cut and fit a length of sponge into a 3mm wide channel. A botch job was required!

Knitmaster 120 Spongebar 1

After a bit of a brainwave, I decided to flip the metal bar upside down, and stick the insulation sponge down along the length of the underneath of the metal bar. I then used a rotary cutter to trim off the excess sponge at the sides, by running it along the bar, flush to the metal. I secured the sponge at each end of the bar with sticky tape, and left the plastic backing on the top of the sponge layer to protect the machine needles (the insulation tape I used was sticky on both sides).

Knitmaster 120 spongebar 2

I seem to have gotten away with it, because when I put the bar back in the machine it worked perfectly! Obviously, insulation tape isn’t designed to work in a knitting machine, so I have no idea how it will stand up to regular wear, but it would be pretty easy to replace again if it disintegrates.

So there you have it, a simple solution to an annoying problem!

If you want more detail about fixing sponge-bar trouble, you can find it in this post.

Tied Up: Another Origami Bag

We’ve got a Japanese origami bag workshop coming up on Friday at Social Fabric, so I entertained myself with making a sample while I wait for my knitting to block. I got to use some amazing Japanese Kokka linen blend fabric…

Kokka Knot Bag3

I made some bags like this before, but this one is fully reversible. It’s pretty straightforward to do: you make two identical bags, which you then sew together (right sides together, wrong sides facing out) leaving a small gap for turning right side out again. Turn, press well and top-stitch close to the edge all the way round, et voila!

Kokka Knot Bag4

Well, not quite voila in my case because I discovered my two bags weren’t as identical as I thought… Luckily, with some wrangling, tweaking, and vigorous pressing, my bag turned out fine (phew!). Still, I’ll be triple checking my measurements next time!

Kokka Knot Bag2

The aqua blue contrasts really well with the vivid colours of the patterned fabric, and the linen content gives the whole thing a nice sturdy feel. It’s a roomy enough to shove books or groceries in and would make a great knitting bag. I’m quite in love with it, shame I have to give it back…

There’s a great tutorial for a basic origami bag here, or if you’re not feeling confident, there are still a couple of spaces left on the workshop…